









sa

Dresses from Shabby Apple
Showing posts with label tutorials. Show all posts

Friday, April 6, 2012

DIY Bow Tie Tutorial

About a week ago I decided to make bow ties for my dog and cats for Easter this year.

They turned out really cute, and they were super easy to make!
This was actually my first EVER sewing attempt, and I'm proud to say that I made it through :)

So I thought I'd share with you how to make your own bow ties for your human or fur babies!


Here's what you'll need:
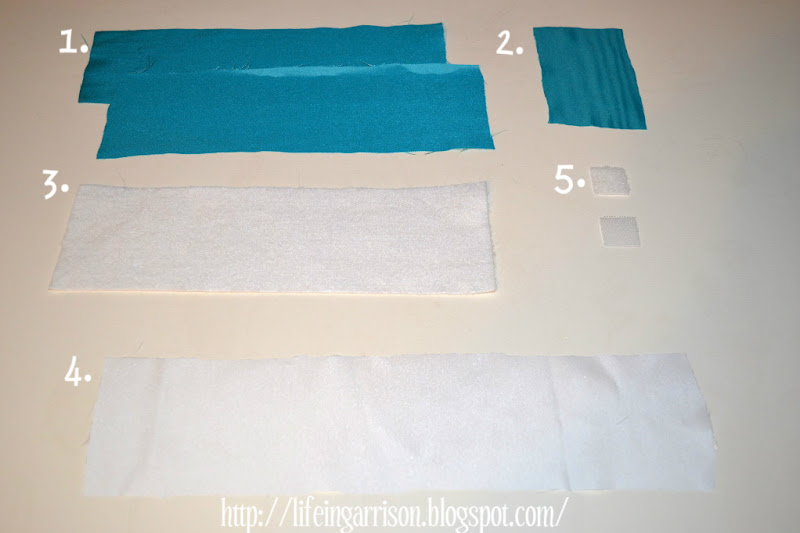

1. Two 3" x 10" pieces of solid color/patterned fabric.  This will be the actual bow tie.

2. One 2.5" x 4" piece of matching solid color/patterned fabric.

3. One 3" x 10" piece of felt.

4. One pice of 3" x _ _ " piece of matching solid color/patterned fabric OR white fabric
I chose white fabric.
This will be the neck strap, and I will tell you how to measure this in a minute.

5. Piece of 1" x 1" square of velcro.


To get the measurement for the length of the neck strap:
-If you are making this bow tie for a child, they need to be wearing the shirt that they will wear the bow tie with.  Raise the collar and measure around the neck.
-If you are making this bow tie for a dog, simply measure them around the neck, or measure the length of the collar.
ONCE YOU HAVE YOUR MEASUREMENT, ADD 2" FOR THE LENGTH OF THE FABRIC.
(so if you measured your child's neck at 13", the fabric needs to be 3" x 15")


Take the two pieces of 3" x 10" fabric and place them "right" sides together.  Place them on top of the piece of 3" x 10" felt.
(The "right" side refers to the side that you would consider the front of the fabric.)


Sew around a 1/4" seam around the entire rectangle of fabric, leaving a gap about 2" wide at one end.
(The gap is indicated with the arrow.)
Trim corners.


At the gap, start to turn the fabric inside out.  Be sure you are turning between the two pieces of fabric so that the felt ends up on the inside between the two pieces of fabric.
I used scissors for this.
Now your rectangle will be right side out with the "right side of the fabric showing on either side.


Tucking in the unfinished edge, bring both ends together and sew them together in the middle.
I used a zig-zag stitch for this.


With the zig-zag portion you just sewed facing out, fold the rectangle in half long ways like the two pictures above show.


Sew an inch long seam about a 1/2" from the edge going through all the layers where the arrow is pointing.
This seam is running from my index finger to my thumb and crosses over the zig-zag stitch.
You may have to hand sew this.
This is to help hold the bow tie together before adding the middle strip of fabric.


When you get done, it should look like this.


Next, take your piece of fabric measuring 2.5" x 4" and fold it in half long ways so that the wrong side is showing and the right side in inside.
Sew a 1/4" seam down the length of the two free edges.


Turn the piece of fabric inside out so that the right side is on the outside again.


Squeeze the top and the bottom of the bow together to make your creases.
Then wrap the little piece of fabric you just sewed around the middle of the bow tie.
Hand sew the two free ends together in the back, making sure to tuck under the frayed ends.


Make your neck strap the same way as you did the little piece of fabric for the center of the bow tie.
Turn right side out.
Use your scissors to guide the neck strap through the middle of the bow tie.


Sew the pieces of velcro onto either end of the neck strap tucking under the frayed ends before you sew.
Make sure that the pieces of velcro are on opposite sides of the neck strap so they will fasten.
In my pictures, the hook and loop part is on the bottom side of the neck strap and the fuzzy part is on the top side of the neck strap.


And there you have it!
Cute bow ties for every occasion for children and dogs alike!

You do not need a sewing machine in order to make these.
In fact, the very first one I made I hand sewed.
Of course, the sewing machine makes it go faster, but it's not a hard or long project without it.

I used satin fabric, but you can use any kind you want.

Let me know if you have any questions, and let me know if you make any!

Happy crafting :)


This tutorial was adapted from the tutorial seen HERE.

Monday, March 26, 2012

DIY Chore Sticks Tutorial

If your house is anything like mine, it has a tendency to get out of control really quick.
With Chris working and me in school full time, it's really hard to get motivated to clean up after a long day.
So this weekend I made us a chore jar!
I'm hoping that it will give us the motivation we need to make sure stuff gets done around the house :)

Here's what you'll need to make your own:

\
Jumbo popsicle sticks
Printout
Scissors
Mod Podge
(I used the matte finish but glossy would work just as well.)
Sponge brush or paint brush
Glass jar


I downloaded this free printout for the popsicle sticks.
(This printout was NOT made by me. It was created by Embellish and taken from Whatever Dee-Dee Wants)


Now for the tedious part. Grab a snack and start cutting!


Keep going! You're almost done!


After you've got your printable all cut out, you're ready to start adhering them to the popsicle sticks.
Take a popsicle stick and brush on a little Mod Podge.
Then press on one of your paper sticks.
I did the same on the back using the blank color paper sticks.


After you have the paper sticks adhered to the wooden sticks, brush with a good coat of Mod Podge all over.


While you're waiting for the sticks to dry, adhere the Chore Jar circle to the front of the jar and the color code chart to the back using Mod Podge.


I love these because they are super specific!
So you don't have to worry about half done cleaning jobs anymore.
No more "I forgot" or "I didn't know I needed to do that" excuses because it says to right on the stick!
Parents: this would be excellent for the child that goes into the bathroom and wipes everything down with a paper towel and thinks they're done ;)

The sticks are color coded by room so the chooser will know what they're picking from.
Parents: this would be good when assigning chores for bad behavior!

There's also sticks in there that make it sort of fun such as "pick two more chores," "trade one chore for a new chore," "parents pick the chores," "kids pick the chores," "freebie: no chores," and "put one chore back."

There's a ton of different chores to even include outside work, playroom work, garage work, and car maintenance like changing the oil!
You can pick which ones to put in your chore jar based on the needs of your family.
I think it's a great idea whether you're married, have kids, or just have a bunch of roommates!


This tutorial was adapted from the tutorial seen on Whatever Dee-Dee Wants
Printable from Embellished via Whatever Dee-Dee Wants.

Wednesday, March 21, 2012

DIY Easter Egg Garland Tutorial

Hey y'all!

I recently made some Easter eggs out of string and turned some of them into garland.

I thought I'd share with you how to make them!


All purpose flour
Liquid starch
(I used Sta-Flo found in the laundry detergent isle at Walmart.)
Water balloons 
String
(I used embroidery floss but any string will do.)


There were so many colors it was hard to choose!

First, you need to make decoupage.  To do this you mix one cup of liquid starch with 1/2 cup of all purpose flour.  Fee free to double or triple this.


Then you need to place your string into the decoupage.  Don't just throw the string in because it will get knotted.  What worked for me was to swirl it piece by piece into the decoupage.  This way I didn't have a problem with knots.


Take a blown up balloon and wind the decoupaged string around it.  I used an entire strand of embroidery floss per balloon.  If you use something that comes in a bigger bundle, you will need to cut off sections.


The balloons will take several hours to dry.  I recommend letting them dry overnight to make sure that they are firm.


After the string has dried over night and is firm, pop the balloons.
If you notice any white crust from the dried decoupage, a straight pin scrapes it off quite nicely.


Then it's time to decorate!
I turned some of mine into a garland.
To do this I used more embroidery floss and threaded it through the eggs.
I secured them where I wanted on the string by using hot glue.


The extras I put in a glass bowl, and they look great in there too!


There are tons of different ways you could use these to decorate.
They were so much fun to make and look so cute!
Let me know if anyone makes these.
I'd love to see what you come up with!

Enjoy!

This craft project was inspired by the craft found HERE.

Tuesday, January 31, 2012

DIY Scratch-Off Valentine's Day Card

Happy Tuesday y'all!

I wanted to share with you this cute tutorial on how to make your own scratch-off Valentine's day card!


1. Download the free card template HERE and type in your date night choices.
Or you can get creative and make your own!

2. Print the card onto card stock and trim. Print the heart template and cut out, then cut a strip of clear Con-Tact paper long enough to make four hearts. Trace around the heart template on the paper side of the Con-Tact paper.

3. To make the scratch-off solution, mix 2 parts metallic acrylic paint with 1 part dishwashing liquid. Using a small, flat paintbrush, apply a thin coat of the scratch off solution onto the front side of the Con-Tact paper and let dry for an hour. Repeat with a second coat, and add a third coat if your paint looks streaky.

4. Cut out the hearts (following the traced outline, peel off the backing, and place over the heart spaces on the card. Package the card with a new penny.

Happy crafting!

I got these instructions and template from Better Homes and Gardens.